
DCC Virtual Classroom:
Getting Started

Things you will need:
- Best choice for audio: A computer headset with a microphone.
- Good choice for audio: Earphones or earbuds, plus a microphone.
- Most webcams and laptops have built-in microphones which are acceptable to use in this setup.
- Backup choice for audio: Teleconference by phone.
- Note: You are responsible for all phone charges incurred by using this option! The numbers provided by Zoom are not toll-free, and most meetings will begin well before the standard nights & weekends period of many cell phone plans.
WARNING! Do not use speakers. That creates feedback. Even if it does not bother you, it will cause problems for other people in the conference.
- Visit the Zoom Support Center. Select the type of computer or device you intend to use (PC, Mac, iOS, or Android), then check the system requirements for that category to make sure your computer or device meets or exceeds the requirements listed.
Getting Started in the DCC Virtual Classroom:
- Read through the "Getting Started" page for your computer or device of choice. Follow the steps on the page to create a Zoom account (it's free) and download the Zoom app to your computer or device.
- If
you are on a PC or Mac, you would do well to also learn about what controls you will have as an attendee in the meetings.
- Whether you plan on joining by computer or phone, you should read through the instructions for setting up your audio connection to the meeting through teleconferencing.
- We want to see you when you attend live! To make sure this happens, learn how to enable and test your video stream.
- Finally, it would be a good idea for you to familiarize yourself with and configure your default Zoom settings.
Joining a Web Conference and Configuring Your Setup:
If your class requires you to join a web conference for any reason, a Zoom meeting will already be set up by your professor, who will provide a direct link to join the meeting from the class Moodle site. In some cases, an invitation to the meeting may be sent by e-mail, which will also include a direct link to the meeting.
- Click on the provided link from your Moodle class site to be directed to the entrance page for the web conference.
- If you do not have the Zoom app loaded on your computer or device, you will be taken to a page like this (Figure 01) where you will be prompted to download and install it:
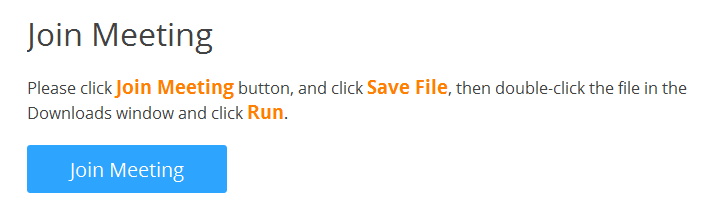
Figure 01
The Zoom app must be installed before you can join a meeting.
- Once the app is installed, you will be able to join the meeting. If the meeting has a password, you will need to enter that before you will be allowed to enter the meeting space. Any meeting passwords will be able to be found on your Moodle class site in the During Class resource you used to get into the meeting.
IMPORTANT: Remember to use your FULL NAME when you sign in. This is what will show up on screen in class and will be how your professor identifies who is present. You have the option to join as a guest without creating a Zoom account. By creating an account, though, the meetings you attend will be retained in your Zoom history, which will make accessing them easier in the future.
- After clicking "Join," the meeting space will begin to load. The loading process should not take long. If you find yourself waiting for two or more minutes, it may be a good idea to cancel the process, restart your browser, and go through the joining process again.
**If you need technical support, you can submit a request at through the Zoom support page.**
- If you do not have the Zoom app loaded on your computer or device, you will be taken to a page like this (Figure 01) where you will be prompted to download and install it:
- Once the meeting space is loaded, be sure to join the audio conference and start your video so that the class can see and hear you. For more information on these processes, see the help pages in the "Getting Started" section above.
- CONGRATULATIONS! You are now ready to start interacting with your professor and fellow students in a Zoom meeting!