Figure 1. Configure Microphone as your recording source
A few basic setup configurations are required in order to record a speech or presentation. First, connect your microphone to the microphone-in connection on the PC. Connect headphones to the stereo line out or headphone jack (generally the green audio connection). Don't forget to put those headphones on.
After you launch Audacity, make sure Microphone is selected as the recording source in the drop-down menu on the mixer toolbar.
![]()
Figure 1. Configure Microphone as your recording source
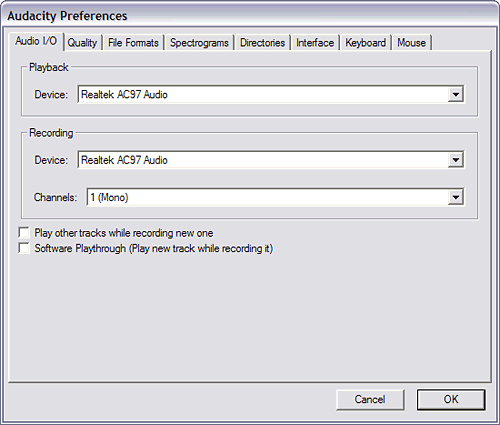
Open the Audacity Preferences window from the File menu. On the Audio I/O tab, verify that your sound card is selected as the device for both playback and recording. In the Channels drop-down box under Recording, choose 1 (Mono). Unless you are using two microphones, the Stereo option simply duplicates the track, making the file size bigger without a resulting improvement to audio fidelity.

Figure 2. Set the audio recording Channels selection to Mono
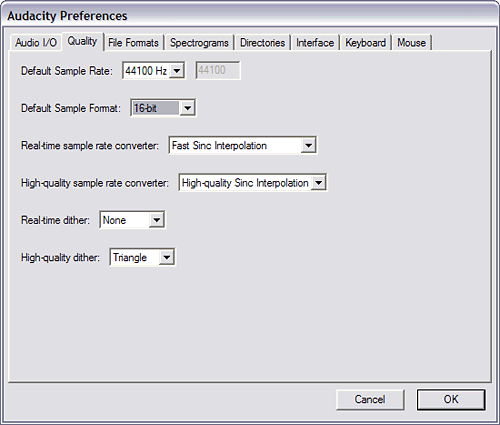
Switch to the Quality tab, and choose 44,100 Hz as the Default Sample Rate and 16-bit as the Default Sample Format. Audiophiles will argue that higher sample rates and formats are better, but for spoken word, 44,100 Hz and 16-bit sampling works admirably, especially considering that the resulting output will be MP3. Ignore the rest of the settings on the Quality tab.

Figure 3. Set the sample rate and bit rate
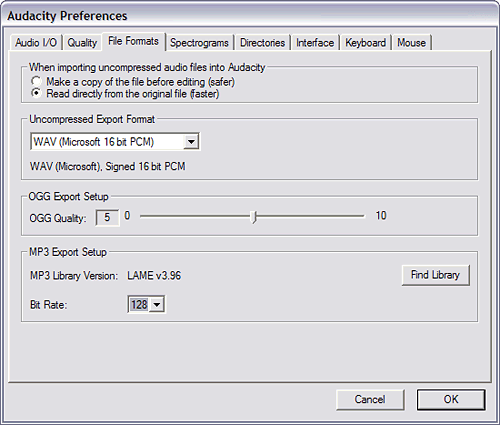
The File Formats tab configures output options. Choose WAV (Microsoft 16 bit PCM) as the Uncompressed Export Format. Leave the OGG Export Setup untouched. Then, find the location at which you extracted the Lame codec to add it to Audacity by clicking on the Find Library button and browsing to the file location. I generally unzip the Lame codec to C:\LAME so I can find it easily, but there's no "right" location. Once you've added Lame support, close the Audacity Preferences window by clicking on OK.

Figure 4. Configure output options
Click on the microphone icon in Audacity's Meter toolbar to turn on monitoring. You should see a red level indicator moving slightly as it picks up ambient room noise. Talk into the microphone and make adjustments to the volume (using the slider control beside the microphone icon) until you get a level that rises close to the right edge of the meter without turning the far-right section solid red. If you get a solid red bar at the far right, the audio is clipping, which means your finished file will sound distorted. Once you've adjusted the level, you're ready to record.


Figure 5. Activate volume-level monitoring
With all the preparations out of the way, it's time to create your first recording. Push the Record button and start talking. When you finish recording, press the yellow square Stop button and save the file in .wav format. Saving is an important step, in order to make sure you don't accidentally delete the file.

Figure 6. Audacity recording controls
It's time to save the audio file as an MP3 to upload to the class site. To save the file as an MP3, open the preferences again, choose the MP3 bit rate on the File Formats tab. (Generally for voice audio, somewhere between 32 and 64 is good enough without making the file size too big.) Close the preferences dialog. Now click on the "File" menu and choose "Export as MP3...."
After you give the file a name and click "Save" another dialog box will come up asking for ID3 tags. Fill in the Title and Artist fields at the very least, so the proper information about your presentation will display on iPods, Zen Micros, and other portable media players.
Important: Acceptable file formats for submission:
NOTE: Do NOT upload the .aup file that Audacity creates. Be certain the file you upload ends with .mp3 or .wma.