
DCC Virtual Classroom:
Getting Started
.png)
Things you will need:
- Best choice for audio: A computer headset with a microphone.
- Good choice for audio: Earphones or earbuds, plus a microphone.
- Most webcams and laptops have built-in microphones which are acceptable to use in this setup.
- Note: If you use this setup, please be in a quiet room or your microphone will bleed highly irritating noise into the conference.
- Backup choice for audio: Teleconference by phone.
- Note: You are responsible for all phone charges incurred by using this option! The number provided by WebEx is not toll-free, and most meetings will begin well before the standard nights & weekends period of most cell phone plans.
WARNING! Do not use speakers. That creates feedback. Even if it does not bother you, it will cause problems for other people in the conference.
- Visit the Cisco Webex System Requirements page and click on "Cisco Webex Meetings" at the top of the page. Make sure the computer you intend to use meets or exceeds the recommended system requirements listed for your particular operating system and internet browser of choice.
- Click here to verify that you have the latest version of Java installed.
Get to know the DCC Virtual Classroom:
- Watch the following short introductory videos at the WebEx How To page:
- "Attend a meeting"
- "Connect to meeting audio"
- "Share your webcam"
- "Share your desktop"
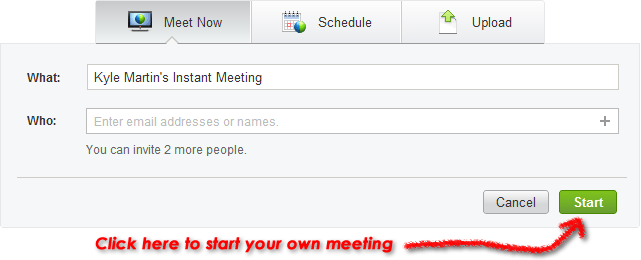
- For more hands-on experience, create a free Basic WebEx account and set up your own meeting.
- Log in using your new account
- Click on the "Meet Now" button at the top of your personalized Home page, then click the
 button to begin your meeting.
Joining a Web Conference and Configuring Your Setup:
- If your class requires you to join a web conference for any reason, a WebEx meeting will already be set up by your professor, who will provide a direct link to join the meeting from the class Moodle site. In some cases, an invitation to the meeting will be sent by e-mail, which will also include a direct link to the meeting.
- Click on the provided link to be directed to the entrance page for the web conference.

- If you do not have a WebEx account, you still need to enter your name and e-mail address in order to get into the meeting. This will not create an account for you, but will simply allow you access to the meeting. Please use your real name (not a screen name) so that your professor will recognize you.
- If you created a free account prior to entering the meeting, then entering your name and the e-mail address with which you registered will bring up a new popup allowing you to login before joining the meeting.
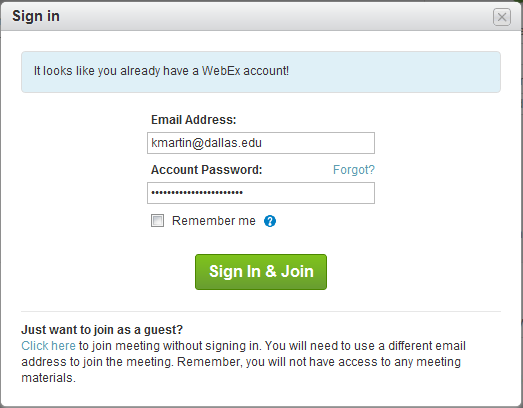
Note: You still have the option to join as a guest without signing in, even if you have registered for a free account. By signing in, though, the meetings you attend will be retained in your WebEx history, which will make accessing them easier if you want to revisit the meeting space to access shared files such as whiteboards or presentations. - After clicking "Join" or "Sign In & Join," the meeting space will begin to load. The loading process should only take 15-60 seconds. If you find yourself waiting for two or more minutes, it may be a good idea to cancel the process, restart your browser, and go through the joining process again.
**If you need technical support, either visit the WebEx support page or call 1-866-229-3239 for WebEx tech support.**
- Click on the provided link to be directed to the entrance page for the web conference.
- Once the meeting space is loaded, you will be immediately presented with an "Audio Conference" popup window asking what audio option you will be using in the meeting. First, click on "Test speaker/microphone" below the
 button.

In the new window that comes up, use the dropdown lists to choose the output and input sources you will be using. Test both accordingly to make sure they are in working order, then click "OK."
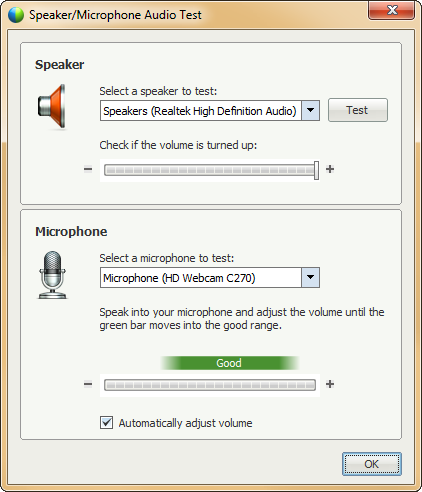
Note: Always test your hardware! You don't want to get into a meeting and find yourself needing to troubleshoot. This is another reason to make sure you are at least 15 minutes early when logging in to the meeting.
You may now click the button and move on to your video setup.
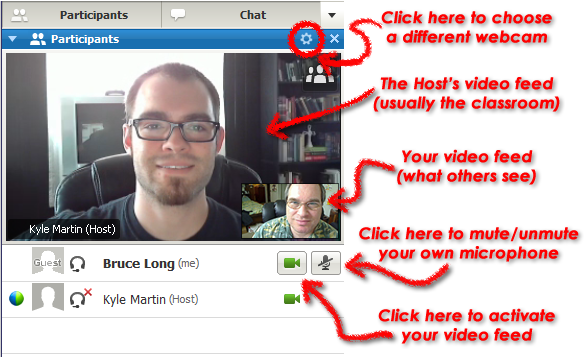
- Now that you are in the meeting space, look to the right side of the meeting window to find the Participants list. Find your name and click on the camera button (
 ) next to it. If you have a webcam hooked up (or integrated if you're using a laptop), this button should automatically detect and activate it.
- If your webcam is not automatically detected, or you want to choose a different video source, click on the settings icon (
 ) in the top right corner of the Participants window to bring up the Video Options window.
- If your webcam is not automatically detected, or you want to choose a different video source, click on the settings icon (
- CONGRATULATIONS! You are now ready to start interacting with your professor and fellow students in a WebEx meeting!
**Again, if you need technical support, either visit the WebEx support page or call 1-866-229-3239 for WebEx tech support.**